Painting a skateboard may seem like a simple project, but without the right techniques and tools, you can damage the deck or create a design that chips off too easily. The deck is the most important part of your skateboard, and improper painting methods can affect its structural integrity or its ability to perform well. This article will walk you through the proper methods for painting a skateboard, from prepping the surface to sealing your design. We’ll cover the essential materials, techniques, and common mistakes to avoid. By the end of this guide, you’ll know how to paint a skateboard in a way that keeps it looking great while ensuring it remains durable for all your skate sessions.

Why Customize Your Skateboard?
Customizing your skateboard isn’t just about aesthetics—it’s about personal expression. Your board is an extension of your style and identity, and painting it gives you the opportunity to show off your creativity. Whether you want a minimalist look, a bold graphic, or something abstract, painting allows you to tailor the design exactly to your liking. Moreover, customizing your skateboard can extend its lifespan. If your board is looking worn out or you’re simply tired of the original design, repainting it can make it feel brand new. Not only will you save money by refreshing your existing deck, but you’ll also have a one-of-a-kind board that no one else at the skate park has. Painting your skateboard is a way to put a personal stamp on something you use every day, turning it into a unique piece of art that’s also functional.
What You Need to Paint a Skateboard
Before you start, it’s important to gather all the necessary materials. This will make the process smoother and ensure you get professional results. Here’s what you’ll need:
Step-by-Step Guide to Paint a Skateboard
This step-by-step guide will help you achieve a durable and attractive paint job while ensuring your skateboard’s performance is not compromised.
Prepping the Deck for Paint
The first step is to prepare the surface of your skateboard deck. Start by removing the trucks, wheels, and any other hardware attached to the board. This will make it easier to paint the entire deck without missing any spots. Once the hardware is off, use 220-grit sandpaper to sand the entire surface of the deck. Sanding the deck ensures that the paint will adhere to the surface and removes any previous paint or coating. After sanding, wipe down the deck with a clean rag and a cleaning solution to remove dust, dirt, and oil. Let the deck dry completely before moving to the next step. Taking the time to properly prep the surface will help the paint stick better and last longer, so don’t rush this part of the process.

Priming and Base Coat
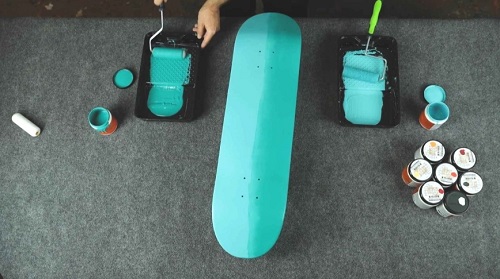
Once your deck is prepped and clean, the next step is to apply a primer. Priming the deck helps the paint bond more effectively with the surface, providing a smoother finish and preventing chipping over time. Use a spray primer, applying it in thin, even coats. Allow the primer to dry completely before moving on to painting. After the primer has dried, apply your base coat. This is the main color that will serve as the backdrop for your design. Use spray paint for an even coat, and make sure to spray from a distance of about 8-12 inches to avoid pooling or dripping. Apply multiple thin layers, allowing each coat to dry completely before adding the next one. This will ensure a smooth and durable finish. The base coat should cover the entire deck, setting the stage for your custom design.
Adding Your Design
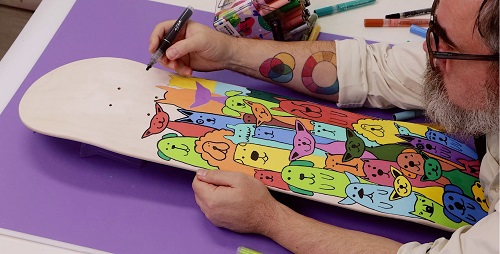
Now that your base coat is dry, it’s time to add your custom design. This is where your creativity comes into play. You can use painter’s tape to create clean lines or stencils for more intricate designs. If you’re confident in freehanding, you can paint directly onto the base coat with acrylic paint. For best results, apply your design in layers, allowing each layer to dry fully before adding more details. If you’re using multiple colors, wait for one color to dry before applying another to avoid smudging. Take your time with this step—precision is key to achieving a professional look. Whether you’re going for a bold graphic or something more abstract, be sure to work slowly and carefully to avoid mistakes.
Sealing the Paint
Once you’ve finished your design and it’s fully dry, the final step is to seal it with a clear coat. The clear coat acts as a protective layer, ensuring that your paint job lasts through daily wear and tear. It also gives your skateboard a glossy or matte finish, depending on the type of clear coat you choose. Apply the clear coat in several thin layers, just like with the paint. Make sure each layer dries completely before applying the next one. This will prevent the clear coat from becoming too thick and causing the paint to crack. Once you’ve applied the final coat, let the deck dry for at least 24-48 hours before reassembling the skateboard. A well-applied clear coat will protect your design from scratches and make your board look polished.
How to Avoid Common Mistakes When Painting a Skateboard
While painting a skateboard, there are several common mistakes to avoid. One of the most frequent errors is skipping the sanding step. Failing to sand the surface will cause the paint to peel or chip easily. Another common mistake is applying too much paint in one go, which leads to drips, uneven coverage, and a longer drying time. Always apply thin layers and give each coat time to dry completely before adding another. Skipping the primer is another mistake. Primer ensures that your paint adheres properly and lasts longer. Finally, neglecting to seal the paint with a clear coat can cause your design to wear off quickly. Always finish with a clear protective layer to safeguard your design from scratches and daily wear.
How Long Does It Take for a Skateboard to Dry After Painting?
The drying time for a skateboard after painting varies depending on the type of paint and the number of layers you’ve applied. Typically, each coat of paint—whether it’s the base coat, design, or clear coat—takes about 24 hours to dry fully. After completing the final clear coat, you should let the skateboard sit for at least 48 hours before reassembling the trucks and wheels. Patience is key during this step. While it might be tempting to rush and start skating as soon as the paint feels dry to the touch, waiting the full drying time will prevent smudging and ensure that the paint bonds properly with the deck. For the best results, store your board in a cool, dry place while it dries, away from direct sunlight or excessive heat.
Conclusion
Painting a skateboard is a great way to personalize your board without damaging the deck, but it requires the right preparation and techniques. By carefully following the steps of sanding, priming, adding a base coat, applying your design, and sealing the paint, you can create a skateboard that looks amazing and holds up to regular use. Taking your time and using the right materials will ensure that the deck remains functional while sporting a fresh, custom design. Now that you know how to paint a skateboard, you can give your deck a makeover that truly reflects your personality. Whether you’re a seasoned skater or a beginner, a custom-painted skateboard will give you a sense of pride every time you hit the park.
FAQ:
Can I paint a skateboard without sanding it first?
No, sanding the skateboard deck is essential to create a smooth surface for the paint to adhere to. Skipping this step can cause the paint to peel or wear off quickly.
What paint should I use to paint my skateboard deck?
The best paints for a skateboard deck are spray paints or acrylic paints designed for outdoor use. Spray paint is ideal for a smooth, even base coat, while acrylic paint is perfect for detailed designs. Always choose high-quality paints to ensure durability.
Will painting a skateboard affect its performance?
If done correctly, painting your skateboard should not affect its performance. The key is to apply thin, even layers of paint and avoid adding too much weight with excessive coats. Always finish with a clear coat to protect the paint and maintain the board’s structural integrity.
