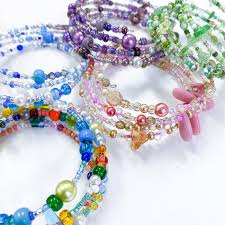
Are you ready to create something stylish and unique with your own hands? How to make a spiral bracelet is one of the most fun and beginner-friendly jewelry-making projects you can try. Whether you’re new to crafting or a seasoned DIY enthusiast, the spiral bracelet is an easy way to kick-start your journey into jewelry making. With just a few materials and a little creativity, you can design a beautiful, one-of-a-kind bracelet in no time.
Let’s get started and show off your crafty side!

What You Need for a Spiral Bracelet
Before diving into the process of creating your spiral bracelet, it’s important to gather all the right materials and tools. Here’s what you’ll need:
Beads: These are the stars of your bracelet. Whether you prefer glass, gemstone, wooden, or acrylic beads, make sure you choose ones that are round and not too large. The beauty of a spiral bracelet lies in its even and consistent shape, so try to pick beads that are all of a similar size.
Memory wire: This is what makes your bracelet “spiral.” Memory wire is a strong, flexible wire that holds its coiled shape, making it perfect for bracelets that wrap around your wrist multiple times. You can usually find memory wire in various diameters to fit your wrist.
Wire cutters: You’ll need a sturdy pair of wire cutters to trim the memory wire to your desired length.
Round nose pliers: These are essential for finishing off the ends of the wire neatly, ensuring your beads don’t fall off.
Jewelry glue (optional): If you want to secure your beads or charms in place, a dab of jewelry glue can come in handy.
Charms and spacers (optional): Want to make your bracelet pop? Adding small charms or spacer beads between your main beads can elevate your design and add a personalized touch.
Now that you’ve got everything ready, it’s time to roll up your sleeves and start creating your spiral bracelet!

Step-by-Step Guide to Making a Spiral Bracelet
Crafting a spiral bracelet is not only a simple process but also a relaxing and enjoyable activity. Follow these steps, and you’ll have your spiral bracelet ready in no time.
Step 1: Measure and Cut the Memory Wire
The first step is to cut your memory wire. Decide how many loops you want your bracelet to have — most spiral bracelets have 3 to 5 loops, but you can go for more or fewer depending on the look you’re after. Use your wire cutters to snip the wire at the point where you’ve completed your desired number of loops. Be careful when cutting, as memory wire can be tough and may spring back.
Step 2: Create a Loop at One End
To keep your beads from sliding off, grab your round nose pliers and create a small loop at one end of the wire. Gently curl the end of the wire into a small, neat loop by twisting the pliers until the wire forms a circle. This will secure your beads as you begin stringing them on.
Step 3: Start Stringing the Beads
Now comes the fun part — adding your beads! Simply slide your chosen beads onto the memory wire, following any pattern or design you have in mind. You can alternate colors, use different bead textures, or even add spacer beads to create a more dynamic look. If you want a more minimalist vibe, sticking with one color or type of bead can look just as stunning.
One tip to keep in mind: don’t overcrowd the wire. Leave a tiny bit of space between each bead to allow the wire to flex and bend as you wear the bracelet.
Step 4: Secure the Other End
Once all your beads are in place, it’s time to finish off the other end of the wire. Just as you did in Step 2, use your round nose pliers to create another small loop at the end of the wire. This will prevent the beads from sliding off and add a professional finish to your bracelet.
If you want to go the extra mile, you can attach a small charm or pendant to the loop for an added flair. The charm will dangle nicely when you wear your bracelet, giving it a personalized touch.
Step 5: Try It On!
That’s it! You’ve made your own spiral bracelet. Now, wrap it around your wrist and see how it looks. Memory wire allows the bracelet to expand and contract, making it a perfect fit for any wrist size. You can create multiple bracelets in different styles and colors to mix and match with your outfits.
Tips for Perfecting Your Spiral Bracelet
While creating a spiral bracelet is easy, there are a few tips and tricks to keep in mind if you want to perfect your jewelry-making skills. Here are some ideas to help you make your spiral bracelet stand out:
1. Experiment with Bead Sizes and Shapes
Though round beads are commonly used for spiral bracelets, don’t be afraid to mix it up! Using beads of different shapes, sizes, and materials can add depth and texture to your bracelet. Try mixing small and large beads or pairing glossy beads with matte ones to create an interesting contrast.
2. Balance Colors Thoughtfully
Color is key when it comes to making a visually appealing spiral bracelet. Consider the color scheme you want to work with before you start stringing your beads. You can go for a monochromatic look using different shades of one color, or create a rainbow effect with beads in multiple hues. For a more elegant bracelet, metallic beads, like gold or silver, paired with neutral colors can be stunning.
3. Don’t Overfill Your Wire
One common mistake beginners make is adding too many beads to the wire, which can make the bracelet stiff and uncomfortable to wear. Be sure to leave a little space between beads so the wire can flex. Your bracelet should feel light and comfortable on your wrist.
4. Add Charms for Extra Flair
If you want to take your bracelet to the next level, add some charms! Charms can make your bracelet more unique and personal. Choose symbols or designs that mean something to you, such as stars, hearts, or initials.
5. Use Glue for Extra Security
While the loops at the ends of your wire will hold the beads in place, you can add a small dab of jewelry glue at the ends for extra security. This ensures that your bracelet stays intact even with everyday wear and tear.
Conclusion
Now that you know how to make a spiral bracelet, the possibilities are endless. This DIY project is simple yet versatile, allowing you to create a stunning piece of jewelry in no time. Whether you’re crafting for fun, making gifts for friends, or just looking for a creative way to relax, the spiral bracelet is a project you’ll want to return to again and again.
So grab your beads, wire, and tools, and let your creativity flow! We can’t wait to see what beautiful designs you come up with.
FAQs
What types of threads can be used for making spiral bracelets?
Common thread options for spiral bracelets include embroidery floss, nylon cord, cotton thread, or waxed linen. These materials are durable, easy to handle, and come in various colors, making them ideal for creating intricate spiral designs.
How can I adjust the size of my spiral bracelet?
To adjust the size of your spiral bracelet, use an adjustable knot or leave extra thread at the ends for tying. Alternatively, include a sliding closure to make the bracelet easy to resize for a perfect fit.
Can I add beads or charms to my spiral bracelet?
Yes, beads or charms can be easily added to spiral bracelets by threading them onto the cords as you weave or incorporating them at the ends. They add decorative detail and personalization to your bracelet design.
